It is a normal case that after you leave your PC alone for a minute, Windows 10 will go to lock screen automatically as it times out. In this way, you have to Press Enter key first and then input the password in order to wake up the computer, about which many users get annoyed.
To make things worse, in some situations, Windows 10 randomly locks screen every two minutes or five minutes. You can find your PC goes into lock screen so fast that you are unable to read a document or check an e-mail in time. That is why some users would rather keep moving the mouse in case PC frequently locks screen.
Anyway, you might as well learn from this article to stop Windows 10 from automatically locking screen after inactivity. In other words, you are to turn off lock screen on Windows 10.
How to Disable Windows 10 Lock Screen?
If you don’t want lock Windows 10 in idle, you can try to adjust computer’s lock screen time out. To keep a monitor from locking, you are supposed to configure all the relevant settings, like screen timeout, screen saver settings, and registry editor if necessary.
After that, it is up to you either to turn off lock screen for Windows 10 or keep it from locking for longer than one minutes.
Methods:
1: Change Windows 10 Screensaver Settings
2: Disable Lock Screen Automatically
3: Disable Windows 10 Auto Lock Screen Using Registry Editor
4: Turn off Lock Screen in Power Options
5: Adjust Windows 10 Lock Screen Timeout
6: Troubleshoot Windows 10 Keeps Locking Screen
Method 1: Change Windows 10 Screensaver Settings
To some extent, while Windows 10 locks screen every one or two minutes, it actually means screen saver settings functions on your computer. As you know, when the computer has not used for a while, the screensaver comes into play and let you enter the lock screen password so as to protect data loss.
From this perspective, lock screen in screen saver settings is to credit, but what if you would rather Windows 10 lock screen turned off?
You just need to change the screen saver settings and disable it. On that occasion, you will also stop Windows 10 Desktop auto lock after one minute of inactivity requiring password.
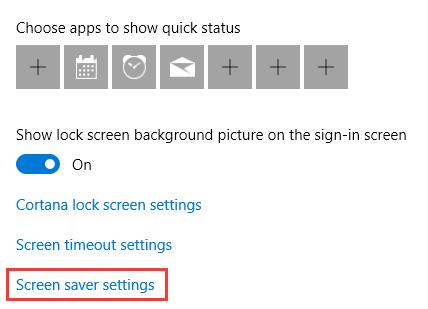
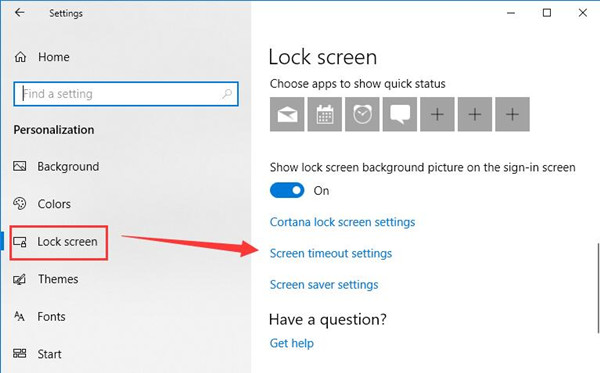
1. Go to Start > Settings > Personalization.
2. Under Lock screen, hit Screen saver settings.
3. Then in Screen saver settings, check the box of On resume, display logon screen and then set it to function after waiting for 1 minute.
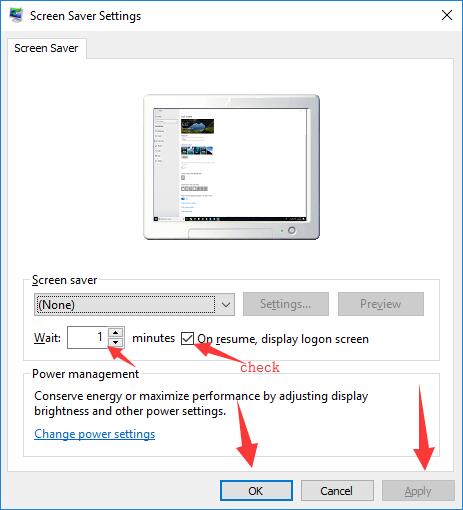
Here this settings of using screen saver after waiting for 1 minute aims to check if Windows 10 screensaver setting on your PC is activated and work well.
4. After that, click Apply and OK to save changes. If you hit OK first and then Apply, it won’t successfully save the changed settings.
5. Reboot Windows 10.
If you confirmed that the screen saver runs well on your PC, you can get started to change it in order to disable Windows 10 auto lock screen.
6. Go to Screen Saver Settings again, and then uncheck the box of On resume, display logon screen.

You will find once the option above unchecked, the time to wait can also be unavailable, which is to say you have disabled Windows 10 auto lock screen.
7. Hit Apply and OK to take effect.
From then on, your PC wouldn’t go to lock screen automatically urging you to enter the password when you want to launch it even if you keep it idle for an hour or more time.
But if you find disabling Windows 10 lock screen will in some sense waste PC power as it will stop your computer from being locked in inactivity, it is also understandable that you enable Windows 10 lock screen time out by changing the screen saver settings.
Method 2: Disable Lock Screen Automatically
Here if you find it troublesome to stop lock screen on Windows 10 by yourself, it is strongly recommended that you try Advanced SystemCare. As an all-in-one system optimizer, Advanced SystemCare is capable of enabling you to disable lock screen automatically within this software.
With no need of turning to Group Policy or Power Options, now let Advanced SystemCare turn off Windows 10 lock screen for you.
1. Download, install and run Advanced SystemCare.
2. Under Toolbox, locate and click System Control.
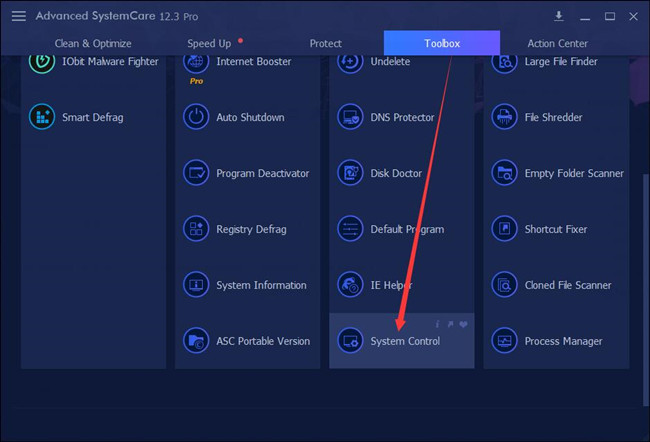
Then you can see Advanced SystemCare is installing the System Control toolbox for you directly and quickly.
3. In IObit System Control, find out General Settings > Function > Lock Screen.
4. Then under Lock Screen, choose to tick the box of Disable screen lock to disable lock screen automatically.
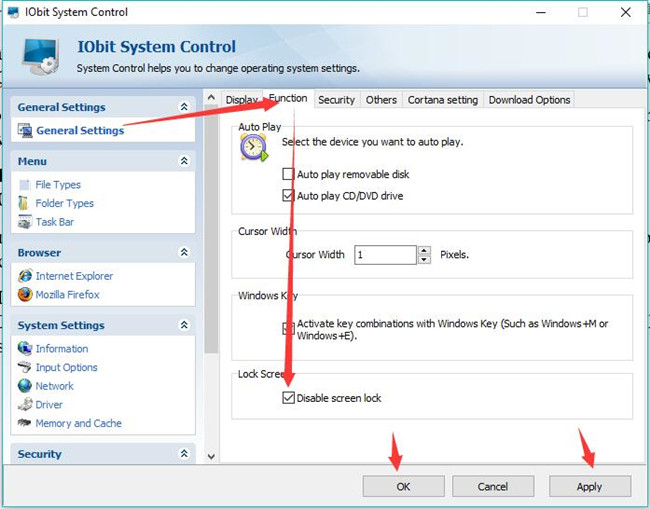
5. Hit Apply and OK to save changes.
From then on, lock screen on Windows 10 won’t pop up when you login in. Here for clients who are prone not to use third-party tools, it is also accessible to try ways below.
Method 3: Disable Windows 10 Auto Lock Screen Using Registry Editor
If your computer keeps locking screen quickly and you found Windows 10 screen saver settings are not working on your PC, perhaps you have to turn to Registry Editor and add a key in it to stop Windows 10 from locking.
Before you go further to adjust Windows 10 lock screen timeout, you would better back up your registries.
1. Press Windows + R to open the Run box and then input regedit in the box.

2. Go as the path:
HKEY_LOCAL_MACHINE \Software\Microsoft\Windows\CurrentVersion\Policies\System\.
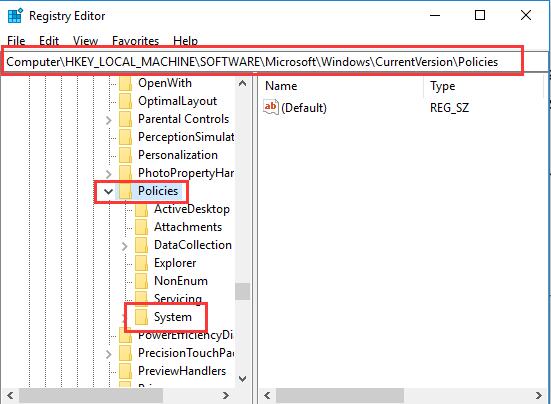
3. Under System, on the right pane, right click the blank space and then create a New DWORD (32-bit) Value.
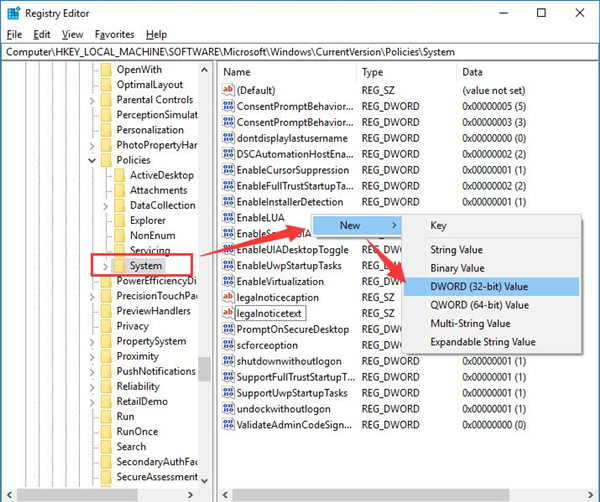
4. Name the new value as InactivityTimeoutSecs.

5. Double click InactivityTimeoutSecs and then change its Value data to 0.
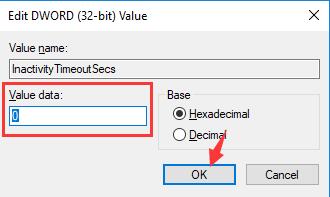
6. Restart Windows 10.
After you boot again, to see if Windows 10 is going to lock screen, you can leave the PC alone for several minutes to check whether you have successfully disabled Windows 10 lock screen in the registry editor.
Even if you disabled lock screen in the registry editor, it is also available to turn it on. And if you enabled Windows 10 lock screen and then customize lock screen.
Method 4: Turn off Lock Screen in Power Options
To avoid Windows 10 goes into lock screen too fast, you can also decide to stop locking screen by changing settings in Power Options.
While you need to know that there is no specific configuration available in Power settings for you to disable the lock screen in Windows 10, it is necessary to add the timeout setting in Registry editor to Power options firstly.
1. In Registry Editor, navigate to HKEYLOCAL_MACHINE\SYSTEM\CurrentControlSet\Control\Power\PowerSettings\7516b95f-f776-4464-8c53-06167f40cc99\8EC4B3A5-6868-48c2-BE75-4F3044BE88A7
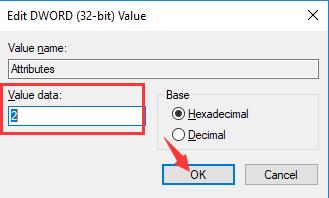
2. Then on the right pane, locate and double click Attributes to modify it.
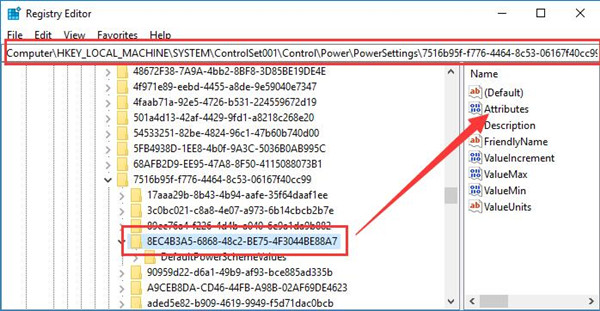
3. Choose to change Attributes value data from 1 to 2.
After you exit Registry Editor, you will have added Windows 10 System unattended sleep timeout to Power Options. So if you feel like disabling the lock screen timeout, move ahead to adjust time out settings in Power settings.
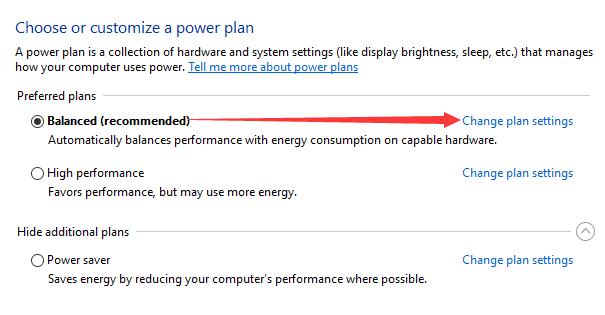
4. Open Control Panel and then find out Power Options.
5. Beside your Preferred plan, click Change plan settings.
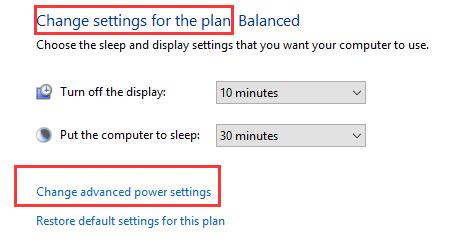
6. Then hit Change advanced power plan settings.
7. In Power Options, scroll down to locate and expand Display and then change an infinite time for Console lock display off timeout.
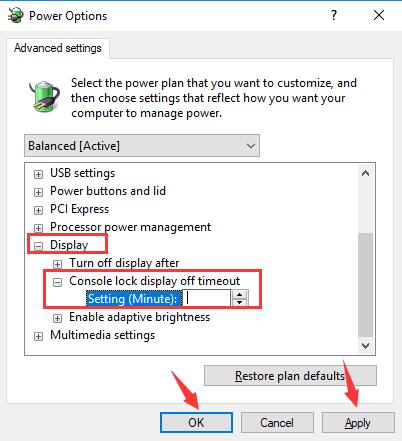
The moment you set to lock screen after a large amount time, it actually stops Windows 10 keeps going to lock screen.
That is how you switch timeout setting to Power options and then prevent Windows 10 from locking in Power settings.
Method 5: Adjust Windows 10 Lock Screen Timeout
It is said that why your screen keeps locking every several minutes consists in that Windows 10 lock screen times out. For instance, if you set screen time out after one minute, after a minute of inactivity, you will find your computer goes to lock screen on Windows 10.
Hence, you would better change Windows 10 screen timeout settings in order to stop it from automatically locking screen.
1. Go to Start > Settings > Personalization.
2. Under Lock Screen, choose Screen timeout settings.
3. Then under Power & sleep, tweak the setting that When plugged in, Screen turn off after as Never, and PC goes to sleep after as Never.
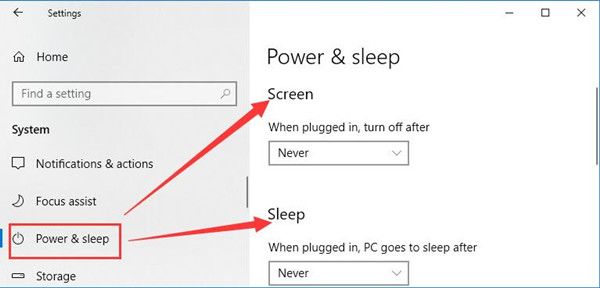
In this process, you will have actually set a sleep timer for Windows 10. Nevertheless, here you choose to make the timer as None on Windows 10.
But in doing so, you will notice that your PC will not be locked as it will never turn off Windows screen and will never go to sleep as well. Windows 10 lock screen has just been turned off.
Method 6: Troubleshoot Windows 10 Keeps Locking Screen
It is reported that even though you set not to time out until after 180 minutes of inactivity or Windows 10 screen saver at 15 minutes or more, the computer goes to lock screen on Windows 10 every one minute.
For most of you, you find Windows 10 locks screen fast in one or two minutes. Every time PC turns to lock screen, you have to enter the sign-in password so that you even determine to remove log-in password for Windows 10 for the sake of convenience.
It denotes that something wrong occurs to your power settings, thus Windows 10 can’t help locking monitor. You may as well make full use of the power troubleshooter to help fix the power issue.
1. Type in troubleshoot in the search box and then hit Enter to navigate into it.
2. Under Troubleshoot, scroll down to find out Power and click Run the troubleshooter.

Soon after that, Windows 10 power troubleshooter will find and fix with your computer’s power settings, including that has something to do with screen saver.
Equipped with this tutorial, you are able to turn Windows 10 lock screen off, hence computer won’t be locked so fast.
More Articles:
How to Change Screen Saver on Windows 10?