Contents:
- Windows Audio Device Graph Isolation Overview
- What is Windows Audio Device Graph Isolation?
- 8 Ways to Fix Windows Audio Device Graph Isolation High CPU Usage
Windows Audio Device Graph Isolation Overview
Windows audio device graph isolation high CPU and memory usage is not a common problem. It appears in some special conditions.
1. People run such games as PUBG.
2. After installing the program especially the Skype, the CPU usage suddenly increased from 25% up to 50%.
3. When talking to Cortana, the Windows audio device graph isolation take 100% disk usage and the audiodg.exe take much CPU resource.
This post would walk you through this Windows audio device graph isolation high CPU when gaming or after Windows 10 upgrade in way of explaining what it is and something about audiodg.exe Windows 10 fix.
What is Windows Audio Device Graph Isolation?
As a part of Windows system, Windows audio device graph isolation, also showing as audiodg.exe in task manager, is a basic audio engine or the digital signal process on Windows 10. It is used mainly to control advanced audio effects.
But it is different from the Windows audio service. Due to this characteristic, users are able to isolate the digital signal processing to take charge of the audio enhancement device without getting rid of the inbuilt audio device.
From the above analysis, it is easy to conclude that audiodg.exe Windows audio device graph isolation is extremely vital for audio enhancement.
Here the case is this process Windows audio device graph isolation in Windows 10 using high CPU. Some people have a question in mind: Why is my Windows audio device isolation using 15% of my CPU?
The reasons why does it sometimes consume so many system resources lie in drive issues, system virus, sound effects, etc. it has something in common with Svchost.exe High CPU and WMI Provider Host High CPU Usage.
How to Fix Windows Audio Device Graph Isolation High CPU Usage Windows 10?
According to the culprits of this hardware or system interruption, you can follow up to solve this audiodg.exe Windows 10 high CPU.
Solutions:
- 1: Turn off Cortana
- 2: Uninstall Audio Drivers
- 3: Update Drivers
- 4: Disable All Sound Effects
- 5: Disable Audio Exclusive Mode
- 7: Check Virus
- 8: Run Audio Troubleshooter
Solution 1: Turn off Cortana
To begin with, according to many users, it does work to disable Hey Cortana to fix audiodg.exe high CPU usage on Windows 10. Since you find high CPU or memory by Windows audio device graph isolation comes up right after you turn on Windows 10 Cortana, you are supposed to try to stop Cortana from running. If you haven’t turned on it or if you find it is of no use disabling Cortana, just go on for other ways.
Solution 2: Uninstall Audio Drivers
Perhaps the audio driver is outdated or faulty on Windows 10, thus causing Windows audio graph isolation high CPU. Therefore, you are supposed to get rid of the audio device driver in case the problematic audio driver causes audiodg.exe high CPU or memory usage.
1. Open Device Manager.
2. Expand Sound, video and game controllers and then right-click the audio driver to Uninstall device.
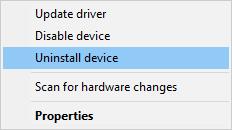
3. Reboot Windows 10 to let it reinstall a new audio driver for you automatically.
But it is said that Device Manager can only install the audio driver of the same version. So if you noticed that Windows audio device graph isolation CPU error still shows in task manager, you need to update the audio driver.
Solution 3: Update Drivers
Making sure the audio drivers on your PC are the most up-to-date is the first thing you can do to fix Windows audio graph isolation high CPU or audiodg.exe high CPU Windows 7 or 8 or 10.
Apart from updating drivers in device manager or from the official site, you would better rely on Driver Booster to download and install all the drivers for Windows 10, including audio or video drivers.
1. Download, install and run Driver Booster on your PC.
2. Click Scan to get Driver Booster to search for the missing, corrupted, and faulty audio drivers.

3. Then locate Sound, video and game controllers to Update the audio driver.
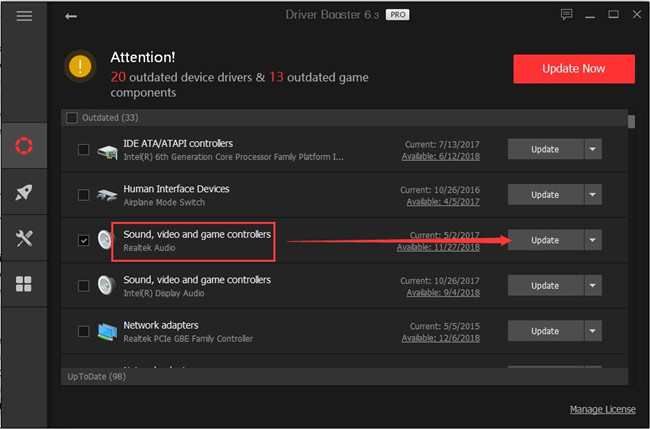
Here you can see Driver Booster is downloading the up-to-date Realtek HD audio drivers.
With the updated audio driver, you can check in Task Manager if Windows audio graph isolation high CPU remains on Windows 10.
Solution 4: Disable All Enhancements
Sometimes, when you are using sound effects on Windows 10, Windows audio device graph isolation high CPU issues Windows 10 or high memory, hard drive come up at the same time.
In fact, the manufacturers providing the hardware allow you to disable this audio enhancement if you like.
In this way, to solve Windows1 0 audiodg.exe high CPU, you may as well manage to turn off all sound enhancements.
1. Right click the Sound icon in the right bottom of the Desktop and then select Sounds from the list.
2. Right click the audio device, Speaker or Headphone or HDMI Output to open its Properties.

Here usually choose the one that you think probably meeting Windows audio device high CPU usage on Windows 10 or the one you have set as default.
3. In Properties window, under Enhancements, tick the box of Disable all enhancements and then hit Apply and OK to take effects.
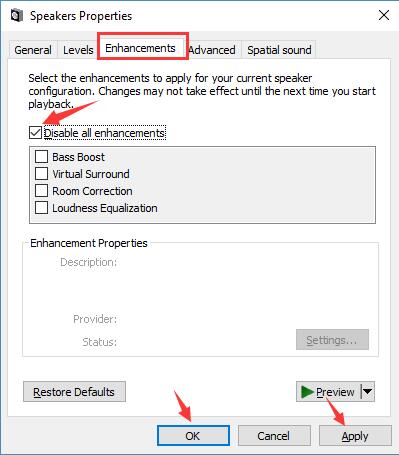
Or here yours may be not Disable all enhancements, instead, it is to Disable all sound effects. Manage to uncheck the box of Disable all sound effects to disable it as well.
Maybe the audiodg.exe Windows high CPU disappeared after that. If not, you would better disable the enhancements for other devices. For some users, it is likely your problem Windows audio device graph isolation no sound can also be fixed.
Solution 5: Disable Audio Exclusive Mode
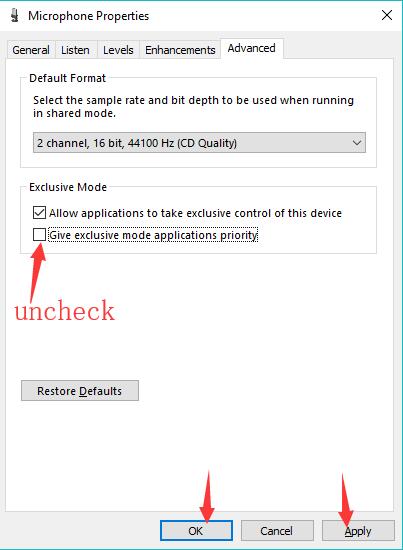
Similar to sound effects or enhancements, the exclusive mode for the audio device can also lead to audiodg.exe high CPU on Windows 10. You can try to disable it as well.
In Speaker Properties or Microphone Properties, under the Advanced tab, uncheck the box of Give exclusive mode applications priority.
Solution 6: Check Virus
You may be confused if Windows audio device graph isolation is a virus on Windows 10. In light of the description for this audiodg.exe process, it is an inbuilt component of Windows systems. Normally, it can never be virus posing threat to your computer.
While, it is possible that this audio service has been misled by some problematic software, thus using too much CPU or RAM in task manager.
To detect whether or not the Windows audio device graph isolation is a virus, what you need to is checking its file location.
1. Right click Start and select Task Manager from the list.
2. In Task Manager, under Processes, locate Windows audio device graph isolation and right click it to Open file location.

3. Check If the audiodg is located in Windows >System 32 folder.
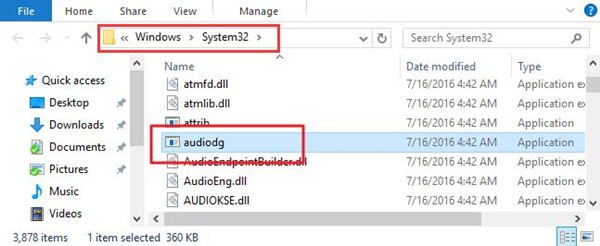
If the Windows 10 audiodg.exe is in Windows >System32 folder, it means it isn’t a virus. If not, you may need to try a Windows audio device graph isolation restart.
At this moment, you must be sure why Windows audio device graph isolation stopped working out of high CPU on Windows 10. If it is the virus taken from soft applications, you may as well run Windows Defender to fully scan your computer on Windows 10.
Solution 7: Run Audio Troubleshooter
Undoubtedly, this audiodg.exe high CPU error is closed related to audio issues on Windows 10, so why not use the built-in troubleshooter for audio to find out what the problems are.
1. Type in Troubleshoot in the search box and hit Enter to navigate to Troubleshoot tab in Update and Security.
2. Under Troubleshoot, scroll down to pinpoint Play audio and click it to Run the troubleshooter.
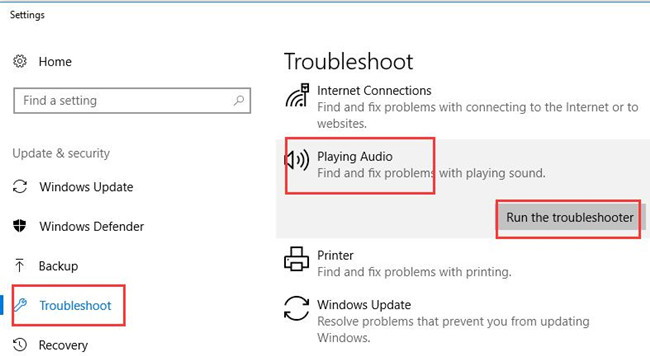
Then this tool will troubleshoot your problems and help fix them for you if possible.
You can open task manager and see if it still uses much CPU usage on Windows 10.
Solution 8: Uninstall and Reinstall Skype Software
For Skype users, whenever you call in Skype app, Windows audio device graph isolation takes up high CPU. From this perspective, it is likely that your Skype software runs into corruption. You need to get rid of the problematic one and reinstall a brand-new one.
Uninstall Skype application:
1. Open Control Panel.
2. In Control Panel, choose to View by Categories and then Uninstall a program under Programs.
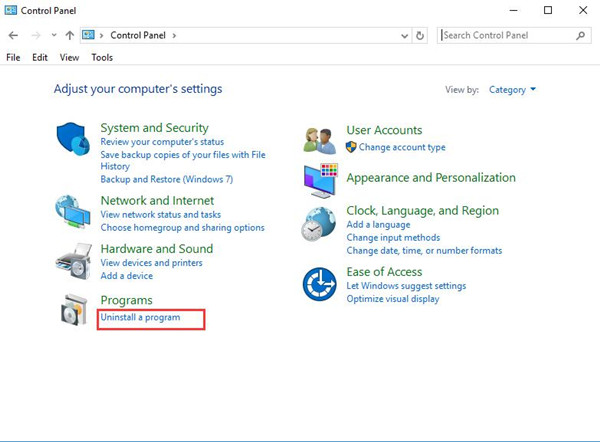
3. In the Programs and Features window, find out and right click Skype to Uninstall it.
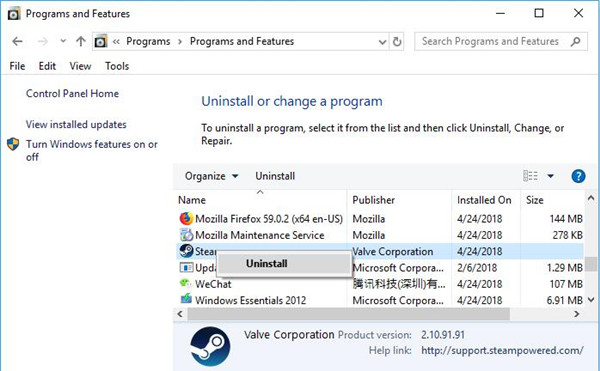
4. Restart Windows 10 to take effect if you are required to do so.
Reinstall Skype:
Then you can navigate to Skype official site to download and install Skype software online.
In some cases, with the new Skype on Windows 10, Windows audio device graph won’t use much CPU resource.
In a word, to fix Windows audio device graph isolation high CPU on Windows 10, you can take advantage of the ways in this post.
More Articles:
Csrss.exe High CPU Usage on Windows 10, 8, 7