Contents:
- What is MsMpEng.exe?
- Should You Uninstall MsMpEng.exe?
- How to Fix MsMpEng.exe High CPU Usage on Windows 10/11?
If you find in task manager there is a process named MsMpEng.exe takes up high CPU on Windows 10, you are supposed to move on to fix this msmpeng.exe issue as soon as possible.
Normally, few of you grasped actually what the msmpeng means for your PC, let alone what you can do to disable msmpeng.exe Windows 10/11.
Under this circumstance, you would better know more about the concept of this Windows process and then decide whether you should remove it in order to solve msmpeng.exe high CPU or high disk usage on Windows 10/11.
What is MsMpEng.exe?
Msmpeng.exe is the central part of Windows Defender service for automatic protection and it is included in Microsoft AntiSpywaresoftware. As a utility for scanning for virus or threats in Windows Defender, MsMpEng is used to help you clear up the software with advertisements or virus.
At default, this MsMpEng exe is located in C:\Program Files\Windows Defender.
It is said that if you downloaded the antivirus program MSE (Microsoft Security Essentials) released by Microsoft, Windows Defender msmpend.exe will automatically change its location to MSE folder on Windows 10 and become the program of MSE as well.
Should You Uninstall MsMpEng.exe?
As you have been prompted, this msmpeng process is embedded in Windows Defender or MSE automatically. So you are not supposed to remove it from Windows 10.
But what if Msmpeng.exe high CPU or msmpeng memory error occurs to you? That may need you to turn to the following problem of this process.
How to Fix MsMpEng.exe High CPU Usage on Windows 10/11?
Since msmpeng.exe is the default program in Windows Defender or MSE, you cannot remove it. What you can do to resolve msmpeng high disk usage or high memory is to make adjustments to Windows defender or MSE.
Therefore, depending on your case, if you are using Windows Defender to protect your PC, you should take measures to fix Windows Defender high CPU by MsMpEng.exe. Otherwise, it is wise for you to tackle MSE error.
And here you need to know that msmpeng.exe high CPU Windows 7 can also happen to you, just like that on Windows 10, you are able to take related measures to fix it on Windows 7 as well.
Solutions:
- 1: Exclude Windows Defender from Scanning MsMpEng Files
- 2: Reschedule Windows Defender Scan
- 3: Disable Windows Defender in Group Policy
- 4: Disable Microsoft Security Essentials
Solution 1: Exclude Windows Defender from Scanning MsMpEng Files
If you have not installed any other antivirus software, Windows Defender will be the guarder of Windows 10. In this situation, you are to change the settings for Windows Defender to avoid MsMpEng.exe high CPU or high memory on Windows 11, 10, or Windows 7.
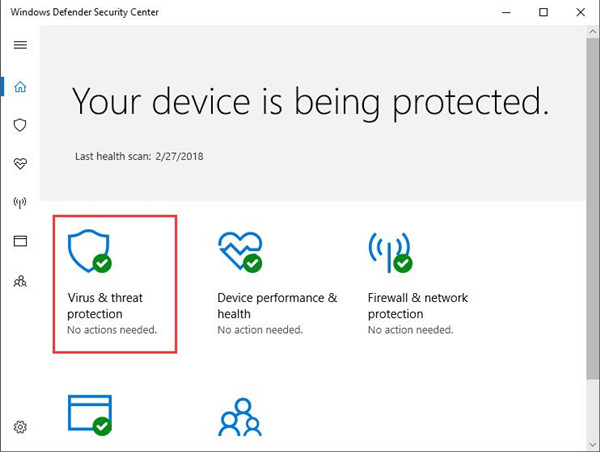
1. Type in Windows Defender Security Center in the search box and then hit Enter to move into it.
2. Then select Virus & threat protection from the options.
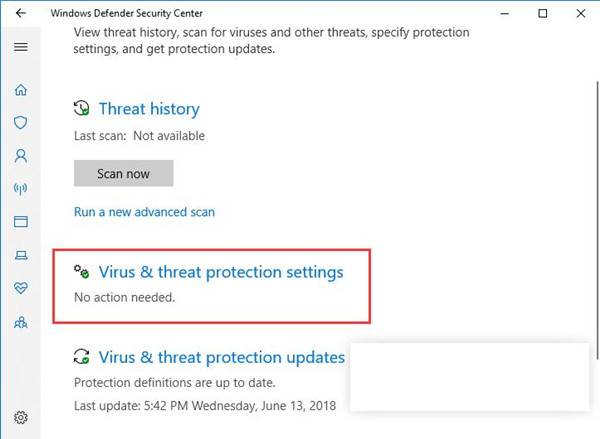
3. After that, choose Virus & threat protection settings.
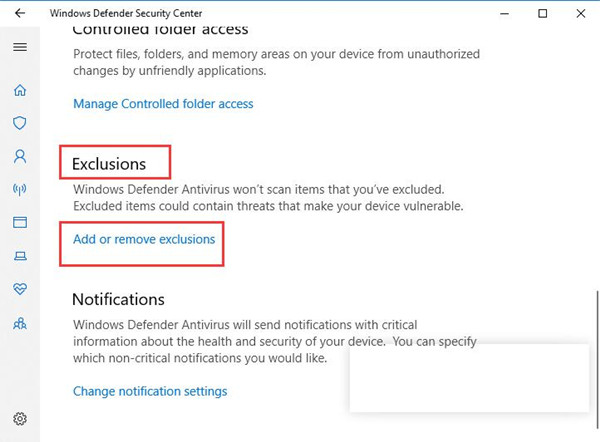
4. Scroll down to locate Exclusions and then click Add or remove extensions.
5. In Exclusions window, hit Add an exclusion and then choose to add a Folder.
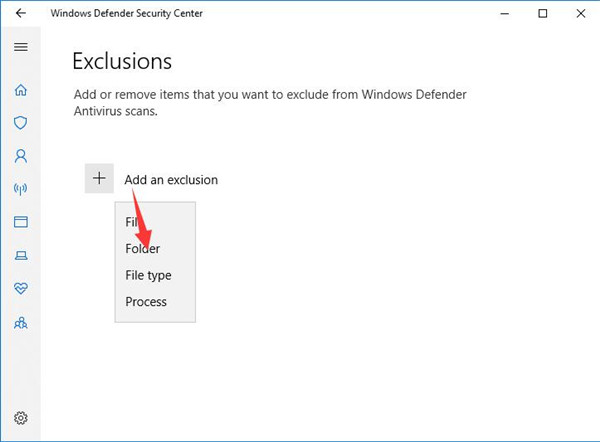
6. Then File Explorer will pop up automatically, you are to copy and paste C:\Program Files\Windows Defender and then click Select Folder.
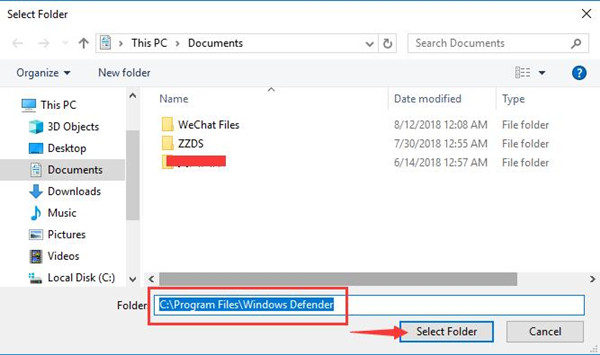
On this occasion, you can see that the Windows Defender folder is added as exclusion.
Now Windows Defender process MsMpEng.exe will not eat up 100% CPU anymore.
Solution 2: Reschedule Windows Defender Scan
In terms of Windows Defender users, there is another thing you can do in order to remove MsMpEng.exe. That is to reschedule Windows Defender activity on Windows 10. In this sense, the msmpeng.exe high disk usage or high CPU will not come to you.
1. Input Task Scheduler in the search box and then hit Enter to go into it.
2. In Task Scheduler, go to Task Scheduler Library > Microsoft > Windows.
3. Then under Windows, locate Windows Defender.
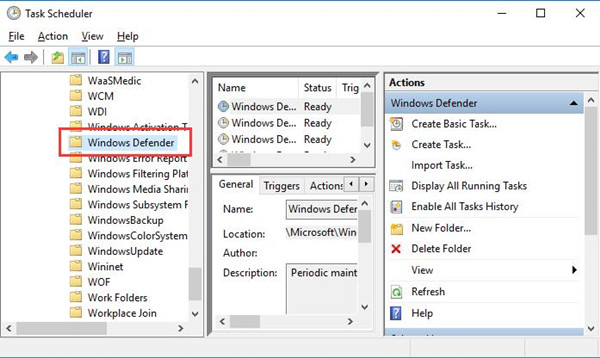
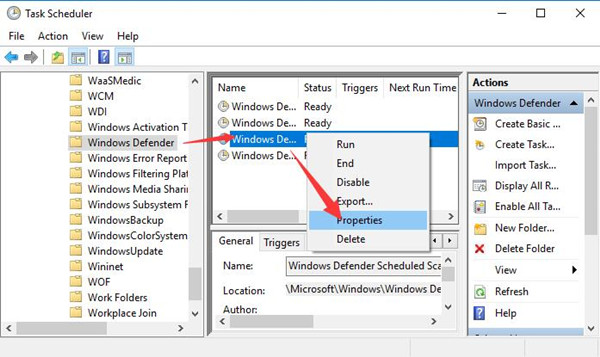
4. Under Windows Defender, on the middle pane, locate Windows Defender Scheduled Scan and then right click it to open its Properties.
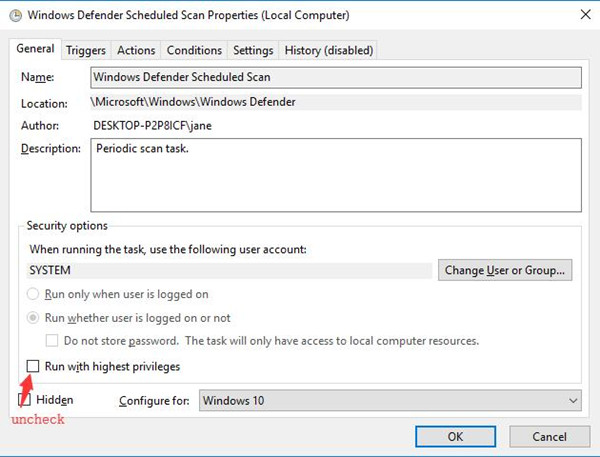
5. In Properties window, under the General tab, uncheck the box of Run with highest privileges.
6. Then under the Conditions tab, uncheck all the boxes needing to activate Windows Defender.
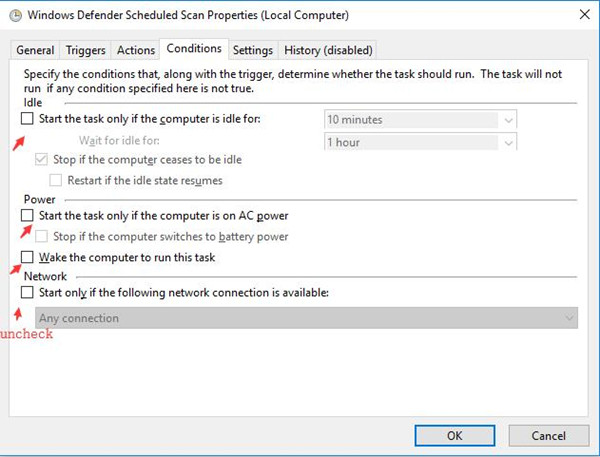
For instance, uncheck the box of Start the task only if the computer is idle for.
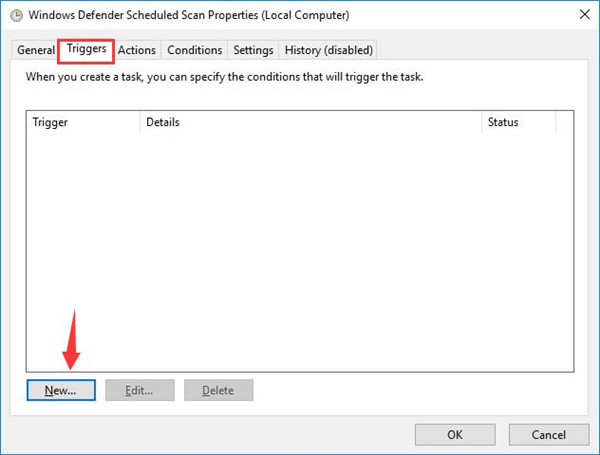
7. Under the Triggers tab, click New.
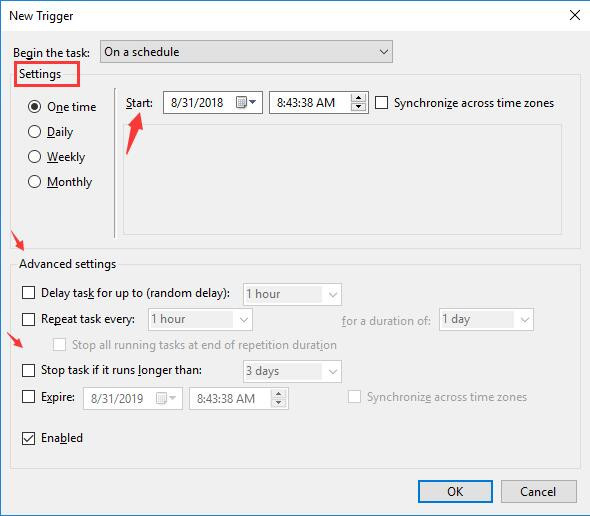
8. Then in the New Trigger window, change the settings for it, such as the start time for scanning.
All done, close the Task Scheduler window.
This time try to open the task manager and then check whether Windows Defender process msmpeng.exe still occupies much CPU on Windows 10/11.
Solution 3: Disable Windows Defender in Group Policy
Once the above two ways are unable to fix your msmpeng error on Windows 10, maybe you have to turn off Windows Defender if you feel like to make your PC back to normal from high CPU usage.
1. Press Windows + R to open the Run box and then type in gpedit.msc in the box. Then hit OK to move into Local Group Policy Editor.
2. In Local Group Policy Editor, go as the path:
Computer Configuration > Administrative Templates > Windows Components > Windows Defender Antivirus.
3. Under Windows Defender Antivirus or Windows Defender for some people, on the right pane, locate and double click Turn off Windows Defender Antivirus to configure it.
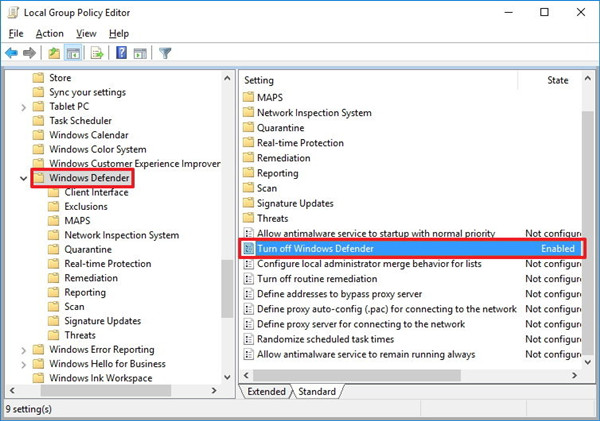
4. Then In Turn off Windows Defender Antivirus, set it as Enabled and then hit Apply and OK to disable Windows Defender.
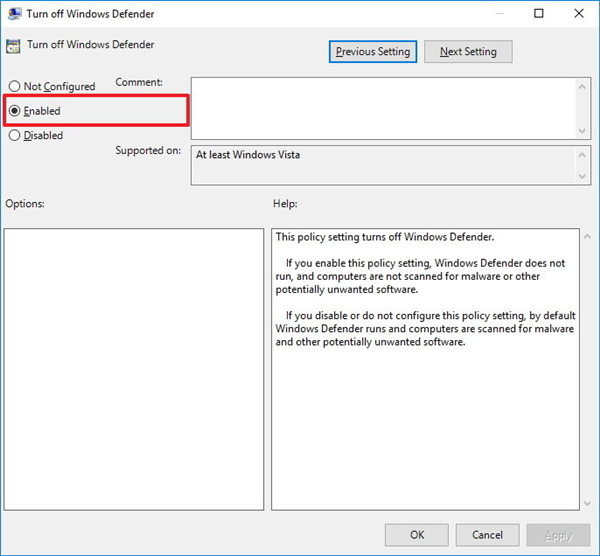
You may as well restart your PC to take effect.
At this moment, Windows Defender will be disabled. So its process MsMpEng.exe high CPU will disappear as well on Windows 10.
After that, you can either choose to download reliable third-party software to protect your computer or you can re-enable Windows Defender on Windows 10 after the MsMpEng.exe high CPU is removed.
Solution 4: Disable Microsoft Security Essentials
For people who are using MSE as the anti-virus or threat program, it is said that you are supposed to turn off the Microsoft security essentials for a while to see if it works for your MsMpEng.exe high memory on Windows 10/11.
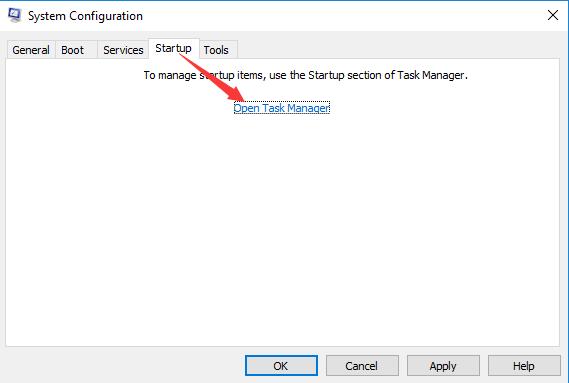
1. Hit Windows + R to open the Run box and then input msconfig in the box.
Click OK to get into System Configuration window.
2. In System Configuration window, under the Startup tab, hit Open Task Manager to manage the processes.
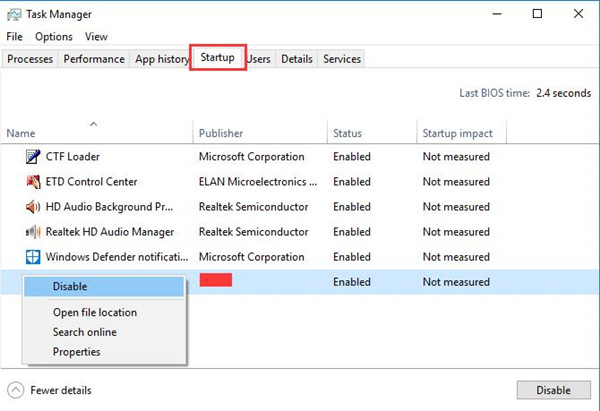
As for some users, it is likely you can see Microsoft Security Essentials here without going into task manager. But if not, just move to task manager.
3. In Task Manager, under Startup tab, find out and pick out Microsoft Security Essentials and right click it to Disable it.
4. Restart your PC to take effect.
Now that the MSE is removed from Windows 10, it is a thing of course that the process msmpeng.exe will not eat up CPU or memory.
Summary:
In normal cases, MsMpEng.exe can’t use up your CPU or RAM on Windows 10/11, and you are not supposed to uninstall this default program in Windows Defender. What you can do even if you happened to msmpeng.exe program causes high CPU is to take ways to reduce the activities of Windows Defender or MSE on your PC. On that occasion, this Windows Defender process won’t cause Windows 10 high CPU or memory.
More Articles:
How to Set CPU Priority to Prefer Foreground Applications