As a snippet screen capture tool, snipping tool is inbuilt in Windows systems. But maybe people are used to using the PrintScreen key or some combination keys to snip screen, few of you have any idea about where is the snipping tool on Windows 10.
Now, this article would let you know how you can get a sniping tool on your PC in order to take screenshots with this cutting tool on Windows 10.
Methods:
- 1: Open Snipping Tool from the Start Menu
- 2: Open it from the Search box
- 3: Open the Snipping Tool by Command Prompt
- 4: Open it Via the Run Box
- 5: Open Snipping Tool in This PC
- 6: Open it by PowerShell
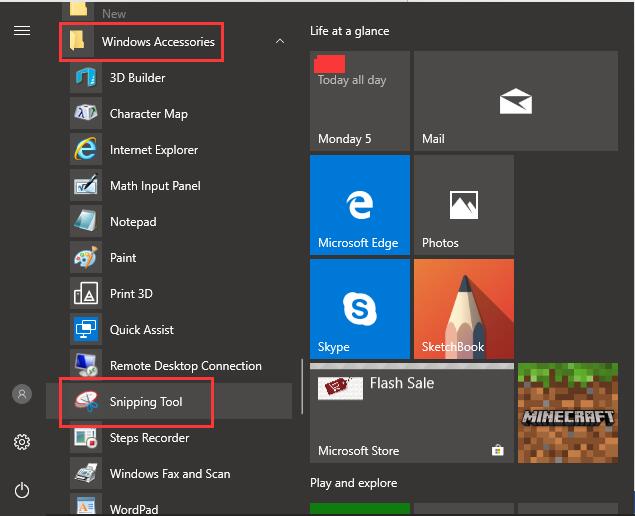
Method 1: Open Snipping Tool from the Start Menu
Normally, the snapshot tool in included in Start menu in Windows 10.
1. Click Start and scroll down Start menu to locate Windows Accessories.
2. Expand Windows Accessories to find out Snipping tool.
Method 2: Open it from the Search box
As the common programs can be found from the search box, there is no exception for snipping tool on Windows 10.
1. Click Start and then type in snipping tool in the search box.
2. Hit Enter to get into the Snipping tool.
Method 3: Open the Snipping Tool by Command Prompt
You are able to use a command in the command prompt to open the snipping tool for Windows 10.
1. Type in Command Prompt in the search box and right click the result to Run as administrator.
2. Then press Enter to navigate to the Command Prompt.
3. In the Command Prompt, input snipping.exe and hit Enter to run this command.
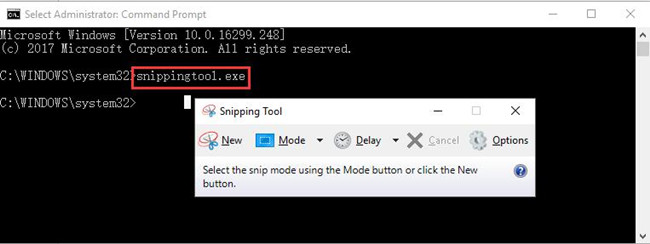
Immediately you press Enter, the Snipping Tool pops up.
Method 4: Open it Via the Run Box
Little do you know the use of the Run box, for many users, it is mainly used to turn on system services or programs, such as Services. Here it is also feasible for you to open the Snipping Tool by Run box.
1. Press Windows + R to activate the Run box.
2. Type in snippingtool in the box and then click OK to get the snipping tool.
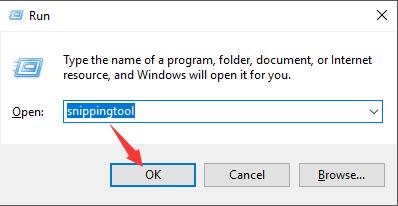
You need to make sure you have no mistaken the spelling, otherwise, you may fail to open the snipping tool in this way.
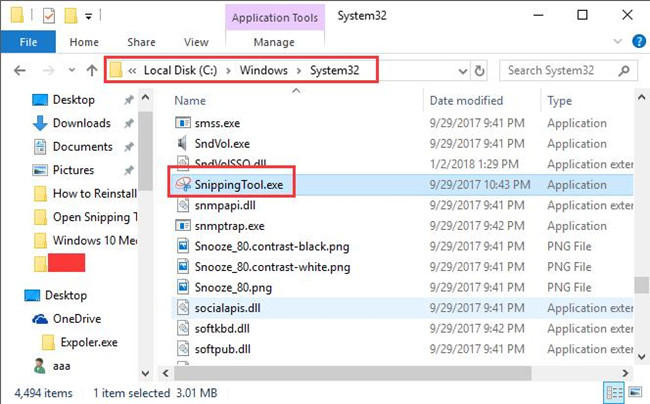
Method 5: Open Snipping Tool in This PC
You can always find the system programs, files in This PC. So instead of keeping wondering where your Snipping Tool is, you may as well find it in This PC.
Go to This PC > Local disk (C:) > Windows > System 32 > SnippingTool.exe.
Then double click the SnipingTool.exe to open it on Windows 10.
Method 6: Open it by PowerShell
Just as the Command Prompt, you need to run the PowerShell as administrator if you would like to use the snipping tool to take screenshots.
1. Right-click the Windows icon and choose PowerShell (Admin) to turn on the PowerShell.
2. In Windows PowerShell, type in the command: snippingtool and then press Enter.
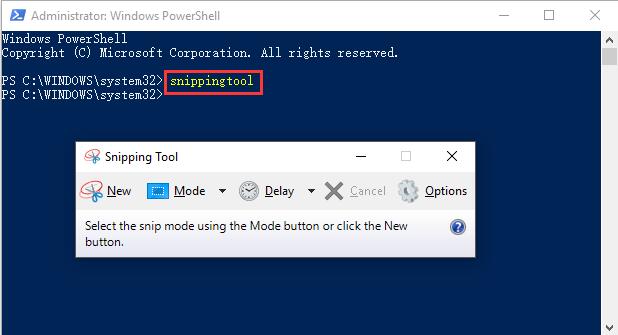
You can also see the Snipping Tool comes up right away.
In short, from this post, there is no doubt that you are qualified to learn many ways to get the Snipping Tool on your PC in Windows 10. Choose the one you think the quickest and most foolproof.
After that, you are free to snip on Windows 10 with the inbuilt tool rather than any third-party software.
More Articles:
How to Open Microsoft Paint on Windows 10