You may find 32-bit or 64-bit subsystem has been removed from Windows server or the subsystem needed to support the image type is not available on Windows 7, 8 or 10.
As long as you encountered this error, you can get the subsystem needed to support missing error message. Now follow up to solve this problem for your PC.
Contents:
Why The Subsystem Needed to Support The Image Type is Not Present?
How to Fix The Image Type is Not Present Error on Windows 10?
Why The Subsystem Needed to Support The Image Type is Not Present?
This issue comes to you usually when you are installing or running a certain program or application with a server core, such as Windows 2008 R2 computer. Or for other people, while you are using Imagex, the subsystem not accessible can also come up.
The main cause of the subsystem needed to support the image lies in that the 32 bit subsystem has been removed by you carelessly or automatically by some process.
On the basis of these occasions where the subsystem needed to support the image type is not available on Windows 7,8, and 10, try the ways below to remove this problem.
How to Fix The Image Type is Not Present Error on Windows 10?
You would better choose various tools on Windows 10 to check if there are any issues with system files, mages and the operating system itself that are related to Imagex Windows 10.
Solutions:
2: Run SFC to Fix the Image Type Is Not Present Problem
3: Perform DISM to Fix the Error Image system files
Solution 1: Enable 32-bit Subsystem
In case you delete the subsystem accidentally, the first thing you would be suggested to do is enabling the subsystem for 32-bit or 64-bit Windows systems.
1. Type in Command Prompt in the search box and right click it to Run as administrator. Here you may as well try to login in Windows 10 with the administrative account.
2. In Command Prompt, enter the following command:
DISM.EXE /online /enable-feature /featurename:ServerCore-WOW64
Tips: Here you must note that the featurename:ServerCoreWOW64 is different on different PC. So you need to check your serve core at first and replace ServerCoreWOW64 with yours.
3. Reboot your PC to take effect.
At the time you sign in again, you can see the 32 bit subsystem appeared. And it is reported that if your subsystem needed to support the image type is not present, all the applications use it will be out of work.
So you can manage to run the software on your PC to check whether they are able to perform correctly.
Solution 2: Run SFC to Fix the Image Type Is Not Present Problem
Now to make sure the system files on Windows 7, 8, and 10 are proper, it is feasible that you use the System File Checker to check the files on your PC. As sometimes, the corrupted system files can lead to subsystem needed to support the image type is not available on Windows 7.
To activate SFC, in Command Prompt, type in sfc/scannow and press Enter to run this command.
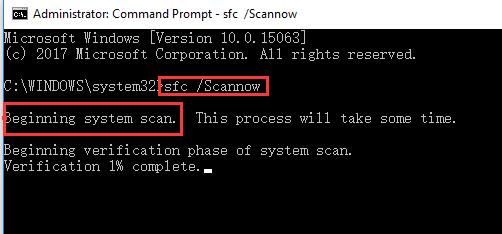
Then you are capable of seeing the System File Checker is detecting the system files on your PC and if possible, it will automatically correct them for you.
Instantly you executed these actions, there will be no more subsystem needed to support the image type is not present on Windows 10. And you can make full use of any application as you wish.
Solution 3: Perform DISM to Fix the Error Image system files
Undoubtedly, this subsystem not available issue must have something to do with the system image on your PC. Hence, to fix the error deeply, Deployment Imaging Servicing and Management, short as DISM is also a useful tool on Windows systems to solve the image issues.
In Command Prompt, copy and paste the following commands and perform them one by one.
DISM /Online /Cleanup-Image /CheckHealth
DISM /Online /Cleanup-Image /ScanHealth
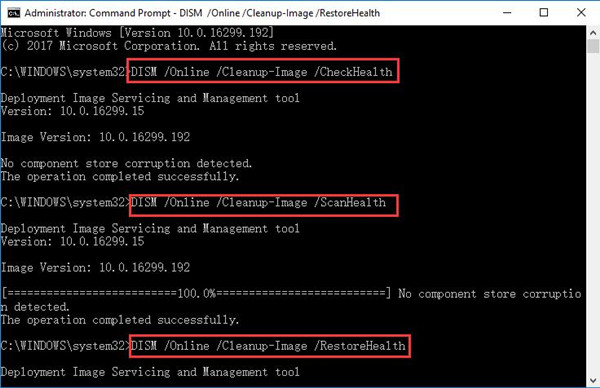
If lucky, you can take notice of the fact that the subsystem needed to support the image type is not displaying is been resolved after the DISM examined the image errors on Windows 7 or 8 or 10.
Solution 4: Restore Windows Systems
Once you find the solutions above are useless for you to deal with the subsystem needed not presenting, you can struggle to restore the systems, like Windows 7 or Windows 10, to a point where the subsystem needed to support the image type is not available disappeared.
You are able to restore Windows 10 manually by yourself. But at the very beginning, you are supposed to enable system restore before restoring the system.
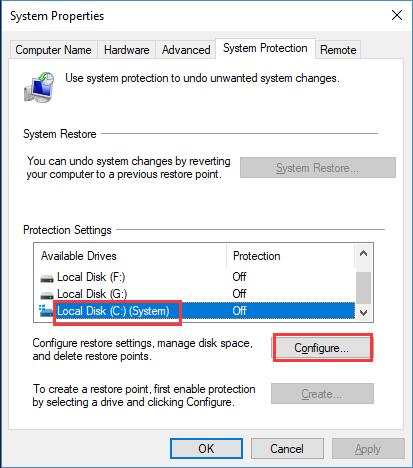
1. Search Create in the search box and then hit the result Create a recovery drive to get into System Properties.
2. In System Properties window, select a drive and click Configure.
3. Tick the box of Turn on system protection and change the volume of Max Usage.
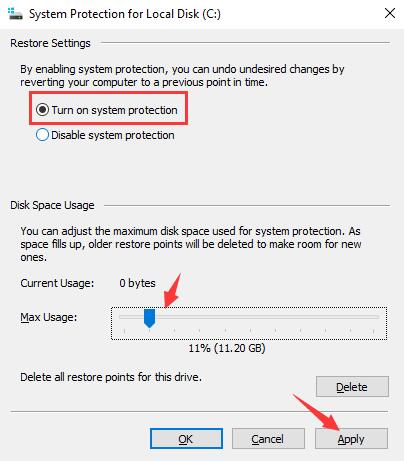
At last, click Apply to save these changes.
The moment you complete this task, you can choose to restore your system to a point until the subsystem needed to support error vanished from your PC.
While even if you found there is no previous system can have the Windows 7 boot problem solved.
If not, maybe you have to reset Windows 10 to check if it works.
To summarize, to help you solve the subsystem needed to support the image type is not present problem, this article mainly shows you the most common but effective ways.
More Articles:
Fix Invalid Value for Registry When Opening Photos
How to Download and Install Windows Photo Gallery on Windows 10