Contents:
What is Superfetch on Windows 10?
How to Disable Superfetch on Windows 10?
Superfetch Overview
Sometimes, when you noticed there is a process or service called Superfetch on Windows 10, you may be rather curious about what it is used to do on your PC and whether or not you should just disable it to avoid potential risks.
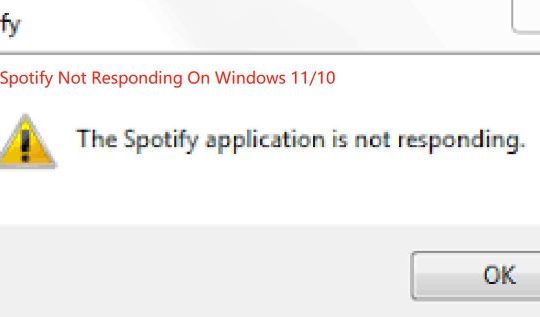
Or in line with some reports of some users, they find Windows 10 Superfetch is causing high CPU or disk usage in Task Manager.
Whatever your purpose is, it is necessary to get the hang of the usage of this Windows process and the ways to turn off the Superfetch permanently on Windows 10.
What is Superfetch on Windows 10?
On Windows XP, this Superfetch service is named as PreFetcher. So if you are running on Windows XP, there is no Superfetch but the PreFetcher on your PC.
In terms of what Windows 10 Superfetch aims to do, it is one of the components of the Windows Memory Manager. To make you better understand it, service host Superfetch is used to control the RAM usage on Windows 10 in order to allow your PC to run more effectively and smoothly.
It is the Superfetch service that enables the application data to be read more quickly by adjusting to your usage patterns, which means that Superfetch or PreFetcher knows for sure what applications you will open next time and preload the data of it before you boot up this program on Windows 10.
As far as this perspective’s concerned, it is not advisable that you decide to disable Superfetch on Windows 10 unless you are facing errors relevant to Superfetch service.
How to Disable Superfetch on Windows 10?
If you wish to turn off Superfetch so as to fix various problems with regard to this process, for instance, high disk usage caused by Superfetch, there are some options open to you.
Solutions:
1: Turn off Windows Superfetch in Services
2: Disable Superfetch Automatically
2: Disable Windows 10 Superfetch in Command Prompt
3: Stop Superfetch in Powershell Windows 10
You can just select one way helpful in your case.
Way 1: Turn off Windows Superfetch in Services
As one of Windows 10 services, this Superfetch can be stopped in the Services program.
It can be extremely foolproof if you are able to follow the procedure below in order to solve Windows 10 Superfetch high CPU on Windows 10.
1. Press Windows + R to activate the Run box and then enter services.msc in the box. Finally, hit OK to go to Services window.
2. Scroll down to find out Superfetch service and right click it to open its Properties.
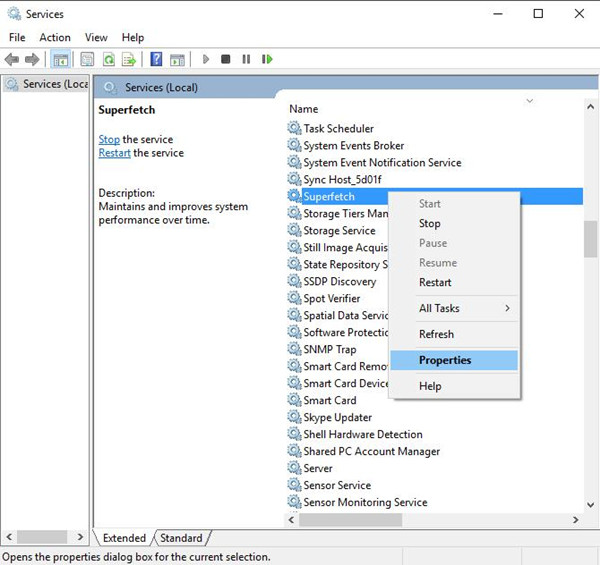
3. In Superfetch Properties window, locate the Startup type and choose to make it Disabled.
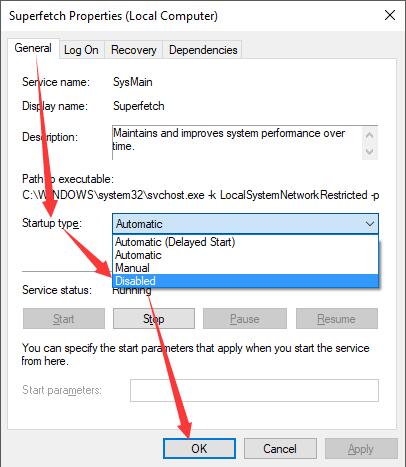
Then under Service status, try to Stop the Superfetch.
4. Click Apply and OK to save changes.
Now you will have already got rid of Windows 10 Superfetch or PreFetcher. You can check if the high disk or high CPU is removed as well.
It is also available for you to enable this Superfetch in Services, just manage to set it Automatic and Start it on Windows 10. So it is totally up to you whether to disable Superfetch or not.
Way 2: Disable Superfetch Automatically
As a service, if you find Superfetch service brings errors to you after it is stopped in Service manager, perhaps there is much need to use a more powerful and intelligent tool to disable it from running. That is Advanced SystemCare. It can monitor the real-time use of startup programs and services by virtue of its toolbox Startup Manager. From user reports, this Startup Manager is so powerful that malware won’t be able to use Superfetch abnormally.
1. Download, install and run Advanced SystemCare.
2. Under Toolbox, locate and click the Startup Manager to get it to run.
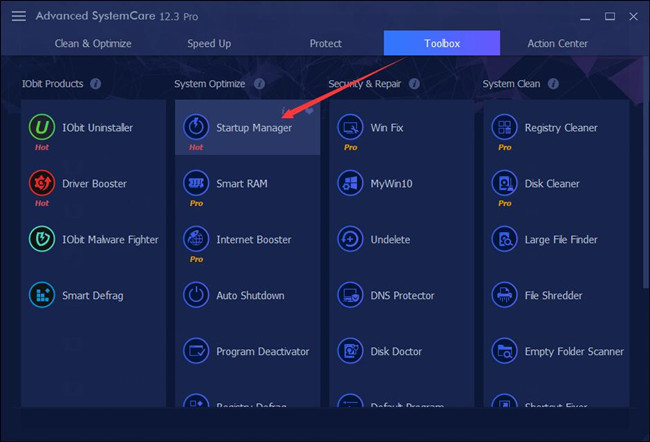
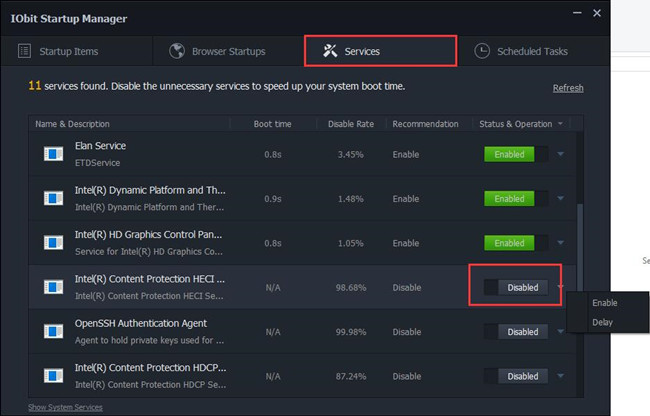
3. In IObit Startup Manager, under Services, find out Superfetch and then make it Disabled.
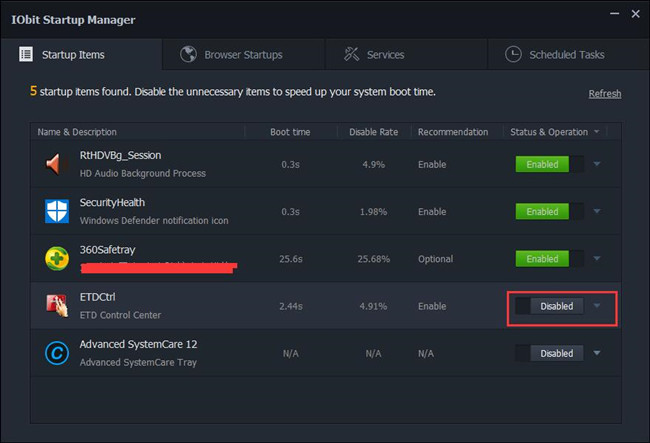
4. Or you can locate Startup Items and then set Superfetch Disabled at startup.
In this sense, Superfetch won’t run at startup by some malware.
Way 3: Disable Windows 10 Superfetch in Command Prompt
You are also qualified to end Superfetch service in cmd on Windows 10. But here you need administrative privileges if you hope to make use of the Command Prompt to perform this action.
1. Type Command Prompt in the search box and then right click it to Run as administrator.
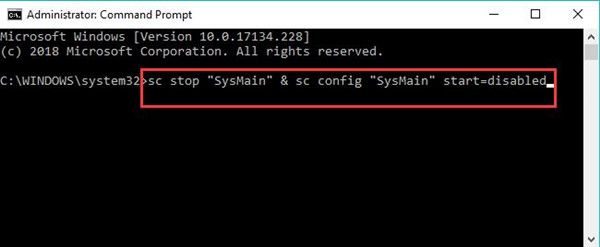
2. In Command Prompt, copy and paste the following command and then hit Enter to run this command to disable Windows 10 Superfetch.
sc stop “SysMain” & sc config “SysMain” start=disabled
It is likely that in Task Manager, Superfetch is not using up your RAM usage as it is stopped on Windows 10.
You can also try to enable this process for Windows 10 in cmd, which needs you to run the command sc config “SysMain” start=auto & sc start “SysMain”.
Way 4: Stop Superfetch in Powershell Windows 10
The same as the way in Command Prompt, to disable Superfetch in Windows 10 via Windows Powershell, you just attempt to perform a command here.
Without the running of the Superfetch, you are free from the error of high CPU or memory by Prefetch or Superfetch.
1. Search Powershell in the search box and then right click the best-matched result to Run as administrator.
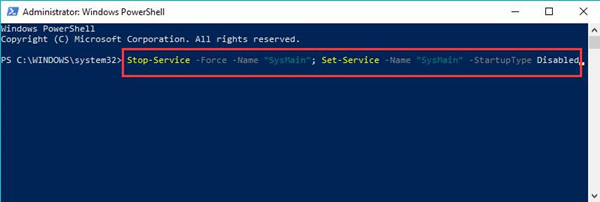
2. In Windows 10 Powershell, enter the command below and stroke Enter to make it work.
Stop-Service -Force -Name “SysMain”; Set-Service -Name “SysMain” -StartupType Disabled
Once you closed Windows Powershell, the Superfetch will be permanently stopped on Windows 10.
There will be no more Superfetch or PreFetcher error haunting you.
In a word, with the help of this article, you will not only know about what the Superfetch is on Windows 10 but only the methods available to you to disable it on your PC. Of course, if you would like to re-enable Windows 10 Superfetch, you can also refer to the contents of this post.
Related Articles:
Fixed: Service Host Local System (Network Restricted) High CPU Usage
Solved: Microsoft Compatibility Telemetry High CPU Usage
Solved: You Must Have Read Permissions to View the Properties of This Object