Contents:
How to Remove Vulkaninfo 32 Windows 11/10?
Vulkaninfo 32 Overview:
Why vulkaninfo sometimes uses high CPU usage on Windows 10 or Windows 11? Is it a virus? These are the concerns plaguing so many users.
Tough you can see this vulkan info 32 in task manager as a Windows process, few of you really know what it means on your PC and what it is used for on Windows 11/10.
Now get to know more about the vulkaninfo.exe NVIDIA. After learning what it is on your computer, if you insist, you are able to remove vulkaninfo 32 software as you wish.
What is Vulkaninfo32.exe?
.exe indicates that the vulkaninfo is an executable file on Windows systems. Vulkan is a kind of modern cross-platform graphics and computer interface used for the graphics card, like AMD, Intel, or NVIDIA graphics card, while the vulkaninfo32 belongs to the graphics application.
It is installed along with the graphics driver, such as AMD driver, Intel HD graphics card driver, or NVIDIA driver on Windows 10. Usually, once there is a display driver update, your vulkan info 32.exe would also be updated.
That is why some users get annoyed about the vulkaninfo.
And there are mainly two kinds of vulkaninfo, namely vulkaninfo 64 for Windows system in 64 bit and vulkaninfo32 for Windows systems in 32-bit.
What is more, it is said that the vulkaninfo32.exe is signed under the name of LunarG, but it is also common that some other files come to your PC in the guise of vulkna info, thus bringing to you various issues or viruses.
In normal situations, vulkaninfo 32 is valid and safe on Windows 10, it is nor a virus, but if it is disguised by malware, like cryptocurrency miners, it becomes a threat for your PC.
So you may as well choose to check the CPU or disk or GPU usage in task manager on Windows 10 to see if this vulkaninfo.exe takes up too high CPU or memory.
If it does occupy you much CPU or disk space, it means vulkan info 32 may be infected by some applications with virus or threats.
Under this circumstance, you might as well decide to use vulkaninfo32.exe to fix the error.
How to Remove Vulkaninfo 32 on Windows 11/10?
Even if it is a component of the graphics card, a service of Windows system, as long as you encounter any error with the vulkan info 32.exe, it is feasible you uninstall it permanently from Windows 10.
If you would like to reuse this vulkaninfo32, you can at first attempt to stop the vulkaninfo service before removing it completely from your computer.
Methods:
1: Stop Vulkan info 32 Service
2: End Vulkaninfo 32 Process Automatically
3: Remove Vulkaninfo32.exe Completely from Windows 11/10
Solution 1: Stop Vulkan info 32 Service
It is advisable you try to end the service at the beginning and then begin to uninstall the vulkaninfo32.exe on Windows 10 either automatically or manually.
1. Hit Windows + R to activate the Run box and then type services.msc in the box.
Click OK to go into Services window.
2. In Services window, scroll down to find out Vulkaninfo 32 service and then right click it to Stop it.
Then you can go back to task manager to see if the vulkaninfo process still occupies high CPU or disk usage on Windows 10.
If it did so, maybe it is useless to just end the service, you need to move on to uninstall the vulkaninfo32.exe for Windows 10.
Solution 2: End Vulkaninfo 32 Process Automatically
If you failed to get rid of Vulkaninfo32.exe in Service widget, or you are unable to remove it completely from Windows 10. It is strongly recommended to use Advanced SystemCare tool. It will help end Vulkan Info 32 process automatically and smoothly.
More importantly, Advanced SystemCare affords you to set priority for Vulkaninfo32.exe supposing that you want it to leave on Windows 10 but running with low CPU or disk usage.
1. Download, install and run Advanced SystemCare.
2. Then locate Toolbox and click Process Manager.
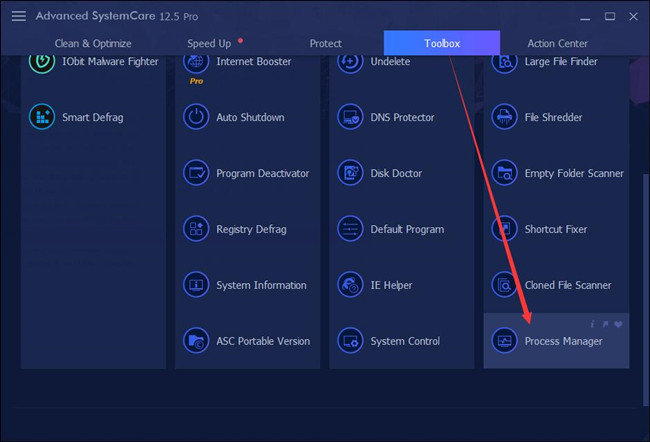
Advanced SystemCare will start installing it immediately after you hit the Process Manager.
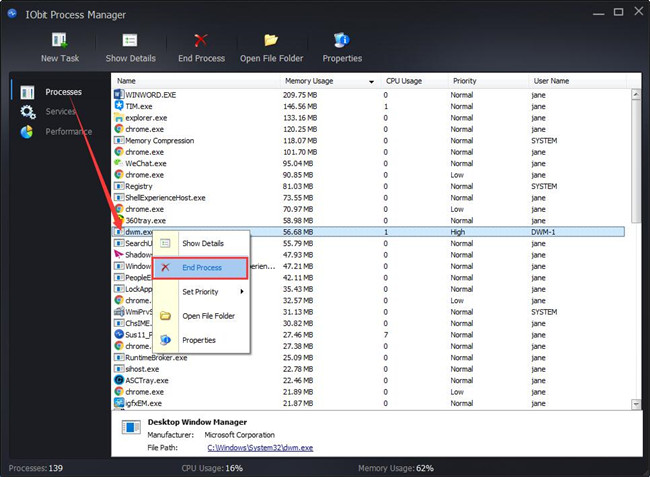
3. In IObit Process Manager, find out Processes and then scroll down to pinpoint Vulkaninfo32.exe.
4. Right click the Vulkan Info 32 process to End Process.
Soon, Advanced SystemCare will help you with removing the Vulkaninfo 32 service on Windows 10. But if it hasn’t, there is much need to navigate to Control Panel to completely remove this process or its relevant programs.
Solution 3: Remove Vulkaninfo32.exe Completely from Windows 11/10
It is sometimes necessary to take some necessary measures in order to fix errors related to vulkan info 32 NVIDIA. You would better try to uninstall the vulkaninfo software in control panel.
Uninstalling it will not cause any damage to your PC, just go ahead.
1. Open Control Panel.
2. Choose to View by Category and then click Uninstall a program under Programs.
3. In Programs and Features window, locate Vulkaninfo and right click to Uninstall it from Windows 10.
Restart your PC to take effect.
When Windows 10 boots up again, you should open task manager again to check whether this vulkaninfo32 uses too much CPU or disk or memory on your PC.
Besides getting rid of this graphics service by yourself, you are able to remove it automatically with a third-party tool. It can be convenient and quick.
In short, with the assistance of this post, you can get the idea about what the vulkaninfo 32.exe is and the ways available for you to remove the vulkan info 32 on Windows 10.
Related Articles:
What is Vulkan RunTime Libraries
Windows 10 Autoplay Not Working
Fixed: The User Profile Service Failed The Sign-in Windows 11/10