Sometimes when your PC runs slowly on Windows 10, you open task manager, just to see a wsappx.exe or wsappx (2) process causing high CPU load. Or even wsappx black screen occurs to you. But you even have no idea why this wsappx is running on Windows 10.
And while you expand this process on Windows 10, you can notice two sub-branches here-AppX Deployment Service (AppXSVC) and Client License Service (ClipSVC) (for Windows 8, it is Windows Store Service (WSService) instead of ClipSVC).
The first thing flashing your mind is how you can disable wsappx process on Windows 10 in order to get rid of the wsappx.exe high disk usage or CPU.
This post will help you not only learn about what wsappx does and the way to fix wsappx problems.
What is Wsappx Windows 10?
Wsappx.exe came along with Windows 8, developed in Windows 10. This wsappx process is an important component of Windows Store and Universal Windows Platform (UWP). It is designed to control the process of installing, updating, and deleting software in Windows Store.
And as for the two branches AppX Deployment Service (AppXSVC) and Client License Service (ClipSVC), they mainly provide infrastructure support for your application or Windows Store.
So it can be obviously seen that you need wsappx during the time to install or update or uninstall applications in Windows Store.
But from another perspective, this wsappx.exe could sometimes take up high CPU or disk usage on Windows 10.
In this way, you would better choose to try some methods to solve the wsappx issue.
How to Fix Wsappx.exe High CPU on Windows 10?
Judging from what the wsappx is used on your PC, you can conclude that so long as you need to install, update or uninstall programs in Windows Store, this wsappx.exe will occupy much of your disk or CPU space Windows 10.
Under this circumstance, you can either decide to stop the automatic Windows updates or disable Windows Store so as to deal with high CPU or disk by this Windows Store process.
Solution 1: Turn off Automatic Windows 10 Updates
Upon the time you disabled the automatic Windows Update, there will be not so much need to use Windows 10 wsappx.exe, therefore, it will not use up your CPU or disk usage.
Now get ready to stop the Windows update.
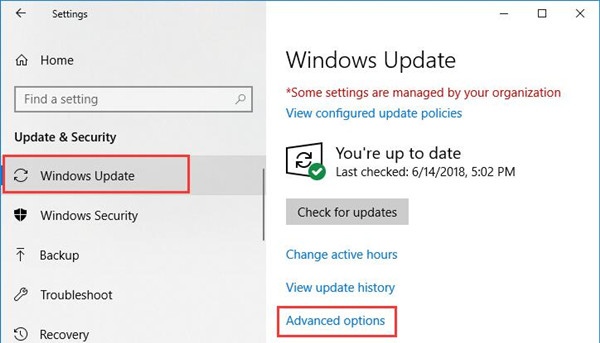
1. Go to Start > Settings > Update & Security.
2. Under Windows Update, click Advanced options.
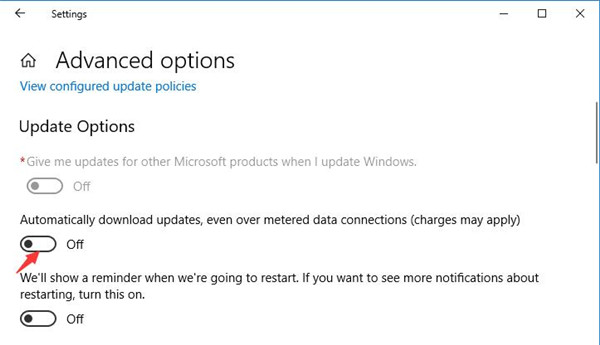
3. Then choose to turn Off the option of Automatically download updates, even over metered data connections.
After that, wsappx process won’t take much CPU on Windows 10. If it is useless for your case, maybe you have to stop wsappx.exe on your PC.
Solution 2: Disable Windows Store to Solve Wsappx High CPU
For people who have asked “Can I disable Wsappx.exe process?”, the answer is no. You cannot stop the wsappx, what you can only do is to exert effort to avoid too many unnecessary Windows updated for Windows 10.
As this wsappx.exe will not run in the background, it will only perform when there are any updates of programs. That is why wasppx is running on your PC. And once the updates are done, wsappx or wsappx (2) would also turn itself off automatically.
In this sense, you are supposed to disable Windows Update to resolve wsappx.exe high disk or CPU usage on Windows 10.
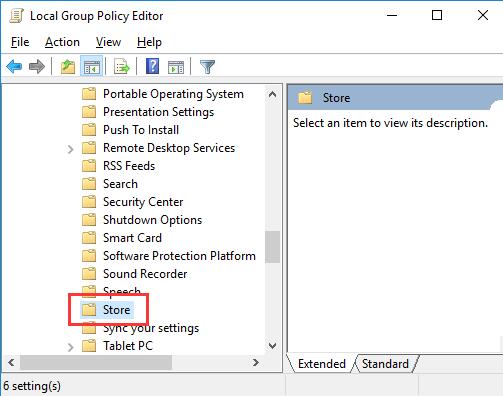
1. Press Windows + R to activate the Run box and then type in gpedit.msc in the box. At last, hit OK to move on.
2. Then in Group Policy Editor, navigate to Local Computer Policy > Computer Configuration > Administrative Templates > Windows Components > Store.
3. Then under Store, on the right pane, locate and double click Turn off the Store application to make changes to the Windows Store app.
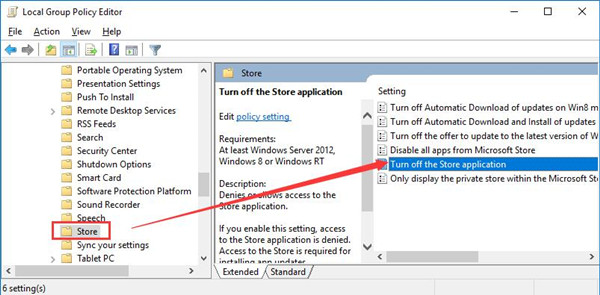
4. Then determine to set Turn off the Store application as Enabled to disable Windows Store.
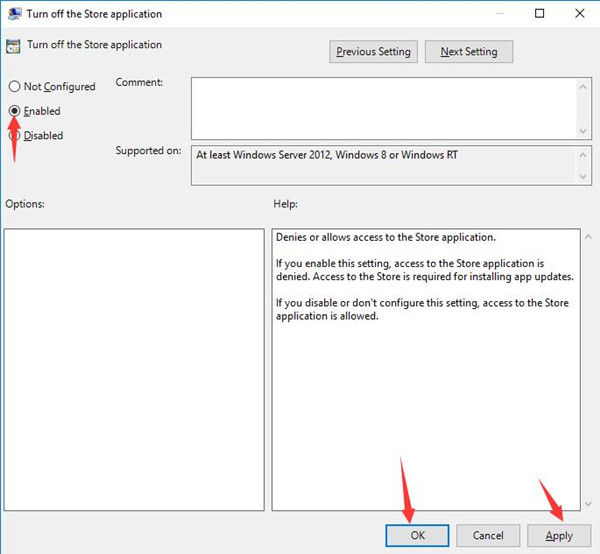
In the last place, click Apply and OK to save changes.
You can restart your PC to take effect.
Once done, you can take notice that the Windows Store app is stopped on Windows 10. And wsappx.exe will not run on your PC to use high CPU or disk usage.
Solution 3: Adjust Virtual Memory Size
If you noticed wsappx takes up much of your memory usage, there is another way you can take to fix wsappx.exe problems.
That is to enlarge the virtual memory on Windows 10. It is suggestible that you adjust virtual memory and then change the size for the RAM for your computer.
After you followed the steps to set the memory, you can also decide to change the minimal or maximum size of the memory.
Only when you know well about your PC can you get the idea how much RAM Windows 10 needs.
Now you can observe that Windows 10 wsappx.exe is not taking much disk usage.
In summary, anything about wsappx can be found in this article. From what this wsappx.exe process is and how to fix problems with it are concluded here, such as high CPU or disk usage on Windows 10 by wsappx (2).
More Articles:
What is atibtmon.exe and How to Fix atibtmon RunTime Error